
Garage Epoxy Preparation, Process, and Care
From diamond grinding to final cure — the step-by-step installation process for a garage epoxy floor, plus the care routine that keeps it looking new.
Garage Epoxy Flooring
2026-10-15
The preparation is where a garage epoxy floor is made or lost. A coating bonded to a properly ground, repaired, and moisture-tested slab lasts for years. A coating applied to an unprepared surface lifts under the first hot tire. Every step of the process — from assessment through cure — exists to make the floor last, and skipping one is the most common reason a coating fails early. Here is what the installation actually involves, start to finish, and how to care for the floor once it's done.
KD Epoxy Floor installs garage epoxy flooring across South Florida, from Palm Beach County to the Florida Keys. We follow the same process on every floor because the steps are what make the system perform. Understanding what happens during installation helps you prepare your garage and plan around the cure window — and knowing the care routine helps the floor stay looking new for years instead of months.
Step 1: Assess the slab, moisture, and existing coating
Before any coating goes down, we assess the slab. We check for moisture — a slab with high moisture content or vapor pressure will compromise the coating bond, and in South Florida's humidity, moisture testing is not optional. We identify any existing coating and test its adhesion. If the old coating is sound and compatible, it may be coated over; if it's peeling, soft, or incompatible, it has to come off first.
We also identify cracks, spalls, joints, and any slab defects that need repair before coating. A coating bridges the surface under it — if that surface is cracked or unstable, the coating telegraphs the defect and eventually fails at it. The assessment tells us what the floor needs before we quote it, so the estimate reflects the real scope.
Step 2: Diamond-grind and profile the surface
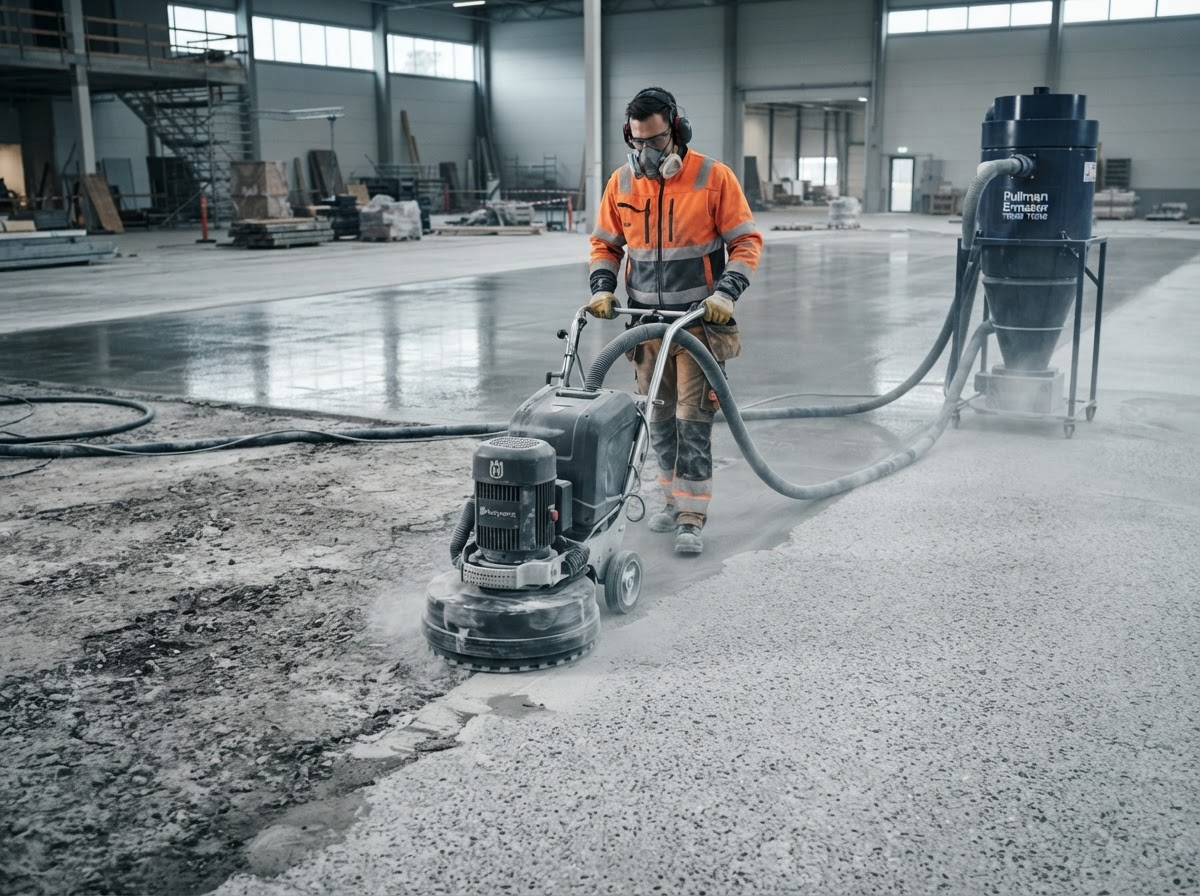
Diamond grinding is the preparation step that makes adhesion possible. The grinder's abrasive discs open the concrete's pore structure and remove contaminants — old sealer, oil, laitance, curing compounds — that would prevent the epoxy from bonding. Without this step, the coating sits on a smooth or contaminated surface and lifts under traffic.
Profiling creates the texture the epoxy locks into. The profile is measured and adjusted to match the coating system — a finer profile for a thin-film system, a coarser one for a high-build system. The goal is a clean, open surface with the right texture for the product that follows. This is the step that separates a floor that lasts from one that peels.
Step 3: Repair cracks, joints, and spalls
Cracks are routed and cleaned to sound material, then filled with a material matched to the crack type. Static cracks get a rigid epoxy paste; moving joints and active cracks get a flexible polyurea filler that accommodates the movement. Spalls and holes are patched with compounds suited to the slab and the coating that follows.
The repair is leveled and profiled so the coating bridges a sound, smooth surface. A coating over an unrepaired crack telegraphs the crack through the finish and eventually fails at it — which is why repair is part of preparation, not a separate decision. See our concrete crack and hole repair for the full repair scope.
Repair materials by crack type
- Epoxy paste — rigid fill for static cracks
- Polyurea joint filler — flexible for moving joints
- Patching compounds — rebuild spalls and holes
- Routing and cleaning — to sound material before fill
Step 4: Apply basecoat, finish, and topcoat
The pigmented basecoat is applied to the prepared slab and delivers the color. For a flake floor, vinyl chips are broadcast into the wet basecoat to the chosen density — fine for a subtle look, medium for balanced texture, full for maximum forgiveness. Loose flakes are scraped after the basecoat sets. For a solid color floor, the basecoat is the finish. For a metallic floor, metallic pigments are worked by hand into the basecoat for movement.
The clear topcoat seals the system and is the wear surface — it takes the abrasion, the chemicals, and the UV from open doors. The topcoat is selected for the use: a standard topcoat for most garages, a heavier-duty or UV-stable topcoat for a garage with sun exposure. The topcoat is what the floor wears against, and a recoat of the topcoat restores the finish without redoing the whole floor.
The cure window and when you can use the floor
After the topcoat goes down, the floor enters its cure window. Pedestrian traffic is usually fine within 24 hours, but full cure before vehicle parking takes longer — typically three to seven days depending on the product and the conditions. South Florida's heat and humidity affect cure time, and your estimator gives you the exact timing for your system and the conditions.
The garage needs to be cleared for the work and the cure. Vehicles, stored items, and anything on the floor need to be out. The slab needs to be dry and at temperature for the coating to bond. We tell you the timeline so you can plan around it — including when it's safe to walk on the floor and when you can park on it. Rushing the cure window is how a floor that should last years fails in months.
Caring for your epoxy garage floor
The care routine is simple: sweep or dust-mop regularly, mop with a neutral pH cleaner, and wipe up oil and chemicals promptly. A sealed epoxy surface doesn't absorb spills the way bare concrete does — the coating resists oil and stains, and spills wipe up instead of soaking in. The topcoat is the wear surface, and keeping it clean is how it stays looking new.
Avoid abrasive pads that can dull the topcoat, and avoid harsh degreasers that can break down the finish. A soft-bristle brush handles any textured areas that a mop alone might miss. If the topcoat dulls in high-traffic areas over time, a recoat restores it without removing the whole system — which is why maintenance is less expensive than replacement.
For a South Florida garage, the routine also includes keeping the floor clear of standing water. Tracked rain or pool runoff should be wiped up, not just because of the slip risk but because standing water on any coated surface can eventually affect the finish. A coated floor is low-maintenance, not no-maintenance — and the routine above is what keeps it looking the way it did the day it was installed.
Daily care routine
- Sweep or dust-mop regularly
- Mop with a neutral pH cleaner
- Wipe up oil and chemicals promptly
- Avoid abrasive pads and harsh degreasers
- Recoat the topcoat when wear appears
Frequently asked questions
How long does the installation take?
A typical residential garage takes one to two days for the coating work, plus the cure window before vehicle traffic. The exact timeline depends on the slab condition, the finish system, and the size. We tell you the schedule for your floor after the assessment.
Do I need to empty the garage completely?
Yes. The slab needs to be clear of vehicles, stored items, and anything on the floor for the grinding, coating, and cure. We tell you what needs to be out and when it can come back so you can plan around the work.
How soon can I park on the new floor?
Pedestrian traffic is usually fine within 24 hours, but full cure before vehicle parking takes longer — typically three to seven days depending on the product and conditions. Your estimator gives you the exact timing for your system.
Will the floor smell during installation?
Epoxy has an odor during application and the early cure window. We ventilate the space during the work, and the odor dissipates as the coating cures. The space should be ventilated during the cure window, and we tell you how long to keep it aired out.
How do I clean an epoxy garage floor?
Sweep or dust-mop regularly, mop with a neutral pH cleaner, and wipe up oil and chemicals promptly. Avoid abrasive pads that can dull the topcoat and harsh degreasers that can break down the finish. A soft-bristle brush handles any textured areas.
Do you serve my area?
We serve South Florida from Palm Beach County to the Florida Keys. Share your project city or ZIP and we'll confirm availability before scheduling your estimate.
Ready to start? Request a custom estimate and we'll walk you through the process for your garage.
More about Garage Epoxy Flooring
What Is Garage Epoxy Flooring? Suitability and Common Questions
A plain-language guide to what garage epoxy flooring actually is, who it's for, and the questions South Florida homeowners ask before coating their garage slab.
Garage Epoxy Options, Comparisons, and Cost Factors
Solid color, decorative flake, and metallic — how the three garage epoxy systems compare, what drives the price, and how to choose without invented numbers.
Garage Epoxy Mistakes, Misconceptions, and How to Avoid Them
The common mistakes that ruin garage epoxy floors — from skipping prep to choosing the wrong finish — and how to prevent them before you coat.